Ask Dr. Bob - Correcting White Balance on JPEG Image
Hello, and welcome to another addition of Ask Dr.Bob.
Billy from Lampuck, West Kansas asks, "Dr. Stupid, Why do I have to go to School?", well Billy, that answer's simple... Your parents are really aliens, and when you go to School, they shed their human skins and breathe fire lint..
Okay.. anyway, I was on a forum earlier today and someone was asking about finding the Gray Point in a picture. So that got me thinking about creating a tutorial about white balancing a JPEG.
So first we take this Wedding photograph, notice that the colour balance is a little off, easy to fix if shot in RAW, but what do you do if you've shot JPEG?

Fear not, you can with a little work fix it! HOW!? I hear you cry.. well lets start.
First you'll need to go to your Layers Palette and select a Threshold Adjustment Layer. We're going to find the Black point in the Photo.

Once you've got the Adjustment dialogue up, slide the slider all the way to the left. Then slowly bring it back until you notice the black apearing. This is your Black Point. Hit Ok

You'll need to go to the Tools Palette and select the Color Sampler Tool, you do this by clicking and holding on the eye dropper tool to show the menu.

Then click on one of the black dots (you can zoom in if this helps you).

Next we're going to find the White Point. Double click on the Threshold Layer and slide the slider all the way to the right, then slowly bring it back to the left until the white starts to show again.

Again using the Color Sampler Tool, place a marker on a white dot.

Ok thats the easy steps taken care of.
Now, we're going to find the grey point of the image.
Hide the Threshold layer (click the eye next to the layer) and create a new layer below it. I called mine Gray.

We need to fill the layer with 50% black, the easiest way to do this is to use the Fill command from the Edit Menu


Once we have our 50% Black Layer, we need to change its mode to Difference in the Layers Palette.

You'll notice that your image changes to some psychedelic colours, but don't worry that's about to change. Show the Threshold Layer again (click the eye) and then double click on the layer. We're going to find the Gray Point!

Send the Slider all the way to the left again, and bring it back slowly until once more the black begins to show. This is your Gray Point!
Grab the Color Sampler Tool and click on a black dot.

We can now delete the 2 layers, they're no longer needed..

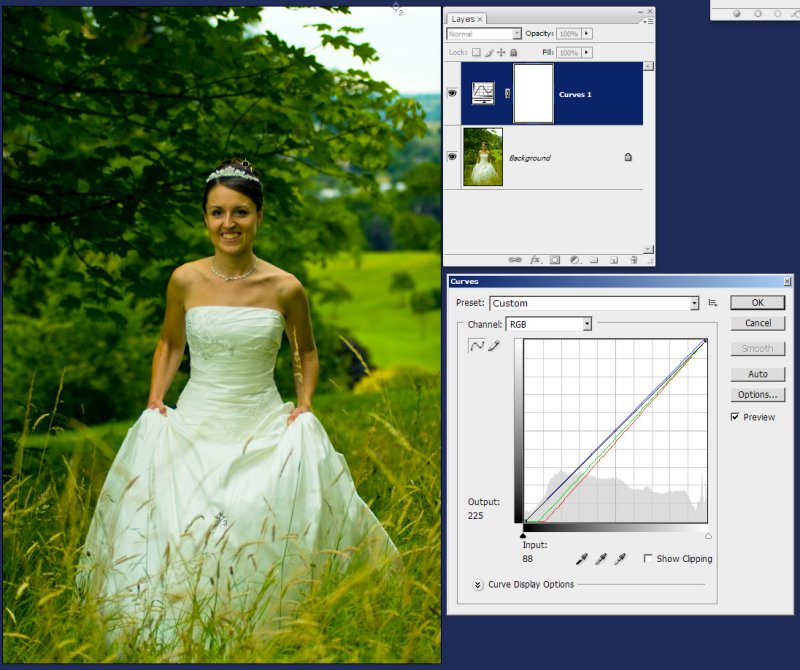
Okay, so now you're thinking what good is this to me? Well, we'll now make a new Adjustment Layer, so in the Layers Palette, select Curves Adjustment.

Wow. So what.. This is for adjusting the Shadow, Midtone and Highlight of a picture right? that's right, but you see those 3 eye droppers?
The first is Shadow. So go ahead and grab that and then click on the Sample labelled 1.

If you need to zoom in to help select the area, place your cursor over the area, then using the mouse wheel zoom into the area, click and then zoom back out.
Grab the Middle dropper, thats right this is the midtone (gray) dropper, so you'll need to select Sample 3.

Look at that, the image is starting to change its colours..
Last grab the right hand dropper, Highlight. Select Sample 2 and we're done!

Alot of steps.. but when all you have to work with is a JPEG, this will help save your neck..
The image is now ready for any sharpening etc. I just added a touch more light.

If you found this tutorial useful and you want to keep seeing these kind of tutorials, please consider making a donation
Billy from Lampuck, West Kansas asks, "Dr. Stupid, Why do I have to go to School?", well Billy, that answer's simple... Your parents are really aliens, and when you go to School, they shed their human skins and breathe fire lint..
Okay.. anyway, I was on a forum earlier today and someone was asking about finding the Gray Point in a picture. So that got me thinking about creating a tutorial about white balancing a JPEG.
So first we take this Wedding photograph, notice that the colour balance is a little off, easy to fix if shot in RAW, but what do you do if you've shot JPEG?
Fear not, you can with a little work fix it! HOW!? I hear you cry.. well lets start.
First you'll need to go to your Layers Palette and select a Threshold Adjustment Layer. We're going to find the Black point in the Photo.
Once you've got the Adjustment dialogue up, slide the slider all the way to the left. Then slowly bring it back until you notice the black apearing. This is your Black Point. Hit Ok
You'll need to go to the Tools Palette and select the Color Sampler Tool, you do this by clicking and holding on the eye dropper tool to show the menu.
Then click on one of the black dots (you can zoom in if this helps you).
Next we're going to find the White Point. Double click on the Threshold Layer and slide the slider all the way to the right, then slowly bring it back to the left until the white starts to show again.
Again using the Color Sampler Tool, place a marker on a white dot.
Ok thats the easy steps taken care of.
Now, we're going to find the grey point of the image.
Hide the Threshold layer (click the eye next to the layer) and create a new layer below it. I called mine Gray.
We need to fill the layer with 50% black, the easiest way to do this is to use the Fill command from the Edit Menu
Once we have our 50% Black Layer, we need to change its mode to Difference in the Layers Palette.
You'll notice that your image changes to some psychedelic colours, but don't worry that's about to change. Show the Threshold Layer again (click the eye) and then double click on the layer. We're going to find the Gray Point!
Send the Slider all the way to the left again, and bring it back slowly until once more the black begins to show. This is your Gray Point!
Grab the Color Sampler Tool and click on a black dot.
We can now delete the 2 layers, they're no longer needed..
Okay, so now you're thinking what good is this to me? Well, we'll now make a new Adjustment Layer, so in the Layers Palette, select Curves Adjustment.
Wow. So what.. This is for adjusting the Shadow, Midtone and Highlight of a picture right? that's right, but you see those 3 eye droppers?
The first is Shadow. So go ahead and grab that and then click on the Sample labelled 1.
If you need to zoom in to help select the area, place your cursor over the area, then using the mouse wheel zoom into the area, click and then zoom back out.
Grab the Middle dropper, thats right this is the midtone (gray) dropper, so you'll need to select Sample 3.
Look at that, the image is starting to change its colours..
Last grab the right hand dropper, Highlight. Select Sample 2 and we're done!
Alot of steps.. but when all you have to work with is a JPEG, this will help save your neck..
The image is now ready for any sharpening etc. I just added a touch more light.
If you found this tutorial useful and you want to keep seeing these kind of tutorials, please consider making a donation


Comments